Discover the art of hanging a stained glass window in your home to add a touch of elegance and color, following these simple steps for secure installation.

Stained glass windows are a beautiful addition to any home, bringing color and light into your space. But if you’re not familiar with the process, hanging one can seem like a daunting task.
Luckily, with a little bit of knowledge and some careful planning, anyone can successfully hang their own stained glass window. In this blog post, we’ll guide you through the process step-by-step so that you can confidently display your stunning piece of art for all to see.
So grab your tools and let’s get started!
Key takeaways:
- Types of stained glass: Leaded, Tiffany-style, fused or kiln-formed.
- Required tools: Tape measure, pencil, level, safety glasses, drill, screwdriver, screws, hanging chain or wire.
- Choosing the right location: Consider lighting, privacy, obstructions, height.
- Measure and plan space: Measure dimensions, create a template, consider obstructions.
- Preparing the window frame: Clean the frame, inspect for damage, secure screws and nails, select appropriate hardware.
Types of Stained Glass

Some popular types include traditional leaded glass, Tiffany-style stained glass, and fused or kiln-formed glass. Traditional leaded stained glass is made by cutting individual pieces of colored or clear textured glasses to fit together like a puzzle within a framework of lead came strips.
Tiffany-style stained-glass windows are created using the copper foil technique where each piece is wrapped in thin copper tape before being soldered together to create intricate designs with smooth lines and curves.
Fused or kiln-formed stained-glass panels are made by layering different colors of crushed or powdered glasses on top of one another before firing them at high temperatures in a kiln until they melt into one solid piece. This type allows for more creative freedom as it can be molded into various shapes such as bowls, plates, vases among others.
Required Tools and Materials
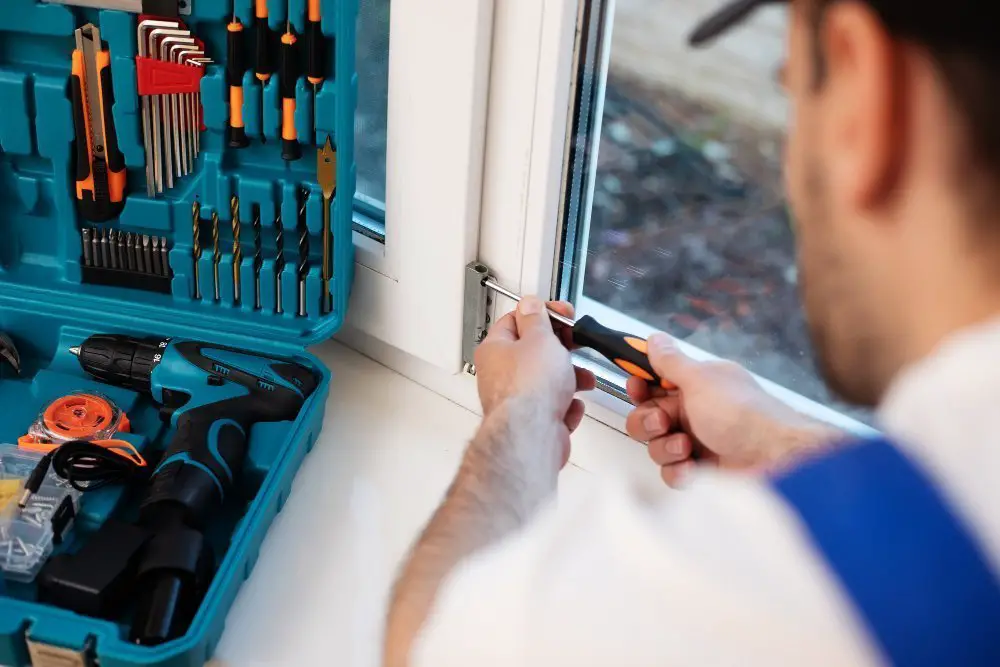
Here is a list of what you’ll need:
- Tape measure
- Pencil or marker
- Level
- Safety glasses and gloves
- Drill with appropriate bits
- Screwdriver (flathead or Phillips)
- Screws (appropriate size for hardware)
- Hanging chain or wire
In addition to these tools, make sure that you have all the materials required for installation such as support brackets, reinforcement bars if needed, and any additional hardware specific to your project.
Having everything on hand before starting will save time in the long run and ensure that your installation goes smoothly without any interruptions due to missing items.
Choosing the Right Location
Consider where you want to hang it and how much light will be shining through. You’ll want to avoid placing your stained glass in direct sunlight as this can cause fading over time.
Instead, look for a spot that receives indirect or filtered light.
Another important factor is privacy – if you’re hanging a stained glass panel in a bathroom or bedroom, make sure that it’s not visible from outside of the room. Consider whether there are any obstructions such as furniture or curtains that could block the view of your beautiful new addition.
Think about how high up on the wall you’d like to place your window – higher placement can create an illusion of height and add visual interest while lower placement may provide more intimacy and detail visibility.
Measure and Plan Space
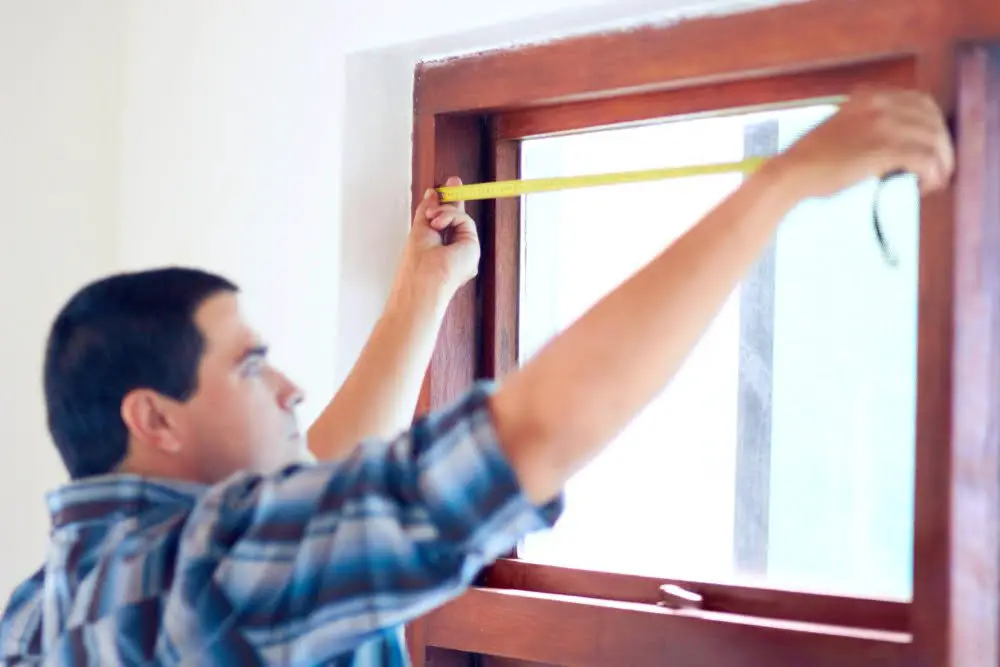
This step is crucial in ensuring that your installation will be secure and visually appealing. Start by measuring the dimensions of both your window frame and the stained glass panel itself.
Take note of any irregularities or obstacles that may affect how you install it.
Next, create a template using paper or cardboard to help visualize how the finished product will look in place. Use this template to experiment with different placement options until you find one that works best for your space.
It’s important to keep in mind any potential obstructions such as furniture or curtains when planning where to hang your stained glass panel so as not to obstruct natural light sources from entering into a room.
Preparing the Window Frame

This involves ensuring that the frame is clean and free of any debris or dust that could interfere with the installation process. Start by wiping down the entire surface of the frame with a damp cloth, paying special attention to any corners or crevices where dirt may have accumulated.
Next, inspect your window for any damage or wear and tear. If there are cracks in the wood or metal frames, these will need to be repaired before proceeding with installation.
You should also check that all screws and nails are securely fastened in place.
Measure your window opening carefully so that you can select hardware components such as brackets and clips which fit properly onto your specific type of framing material (wooden vs metal).
Selecting and Preparing the Hardware

The type of hardware you need will depend on several factors, including the size and weight of your panel as well as the material of your window frame.
For smaller panels or those made from lightweight materials such as plastic or acrylic, suction cups may be sufficient to hold them in place. However, for larger or heavier pieces made from traditional stained glass materials like leaded cames and soldering joints, more secure mounting options are necessary.
One popular option is a zinc came channel which can be screwed into wooden frames with brass screws. Alternatively, if you’re working with metal frames then J-channels are a good choice since they can easily accommodate different thicknesses of glass.
Before installing any hardware onto your frame make sure that it is clean and free from debris so that there is no interference between surfaces when attaching them together later on during installation.
Safety Precautions

Stained glass windows can be heavy and fragile, so it’s essential to handle them with care. Wear gloves when handling the glass panels to avoid cuts or scratches on your hands.
Make sure that you have a sturdy ladder or step stool that can support both your weight and the weight of the window panel.
If possible, enlist a friend or family member to help with lifting and positioning the stained glass window into place. This will not only make things easier but also reduce any risk of injury from trying to do everything alone.
Ensure that all tools are in good working condition before starting work on hanging your stained glass window. Faulty equipment could lead to accidents during installation which is why checking for damage beforehand is crucial for everyone’s safety.
Installing Support Systems
This step is crucial in ensuring that your panel stays securely in place over time. There are a few different options when it comes to support systems, including lead came or copper foil channels.
Lead came is a traditional method of supporting stained glass panels and involves using strips of lead to hold each piece of glass together. Copper foil channels are another option that involve wrapping each piece of glass with thin copper tape before soldering them together.
Whichever method you choose, make sure to carefully follow the instructions provided with your materials and take all necessary safety precautions while working with sharp tools and hot soldering irons. Once you have installed the support system according to manufacturer guidelines, test its strength by gently tapping on various parts of the panel before proceeding further.
Attaching the Stained Glass
Begin by carefully placing the panel into position on top of the support system. Make sure that it is level and centered before proceeding.
Next, use small pieces of copper foil tape or lead came to secure each piece of glass in place within its corresponding channel. This will help keep everything stable as you work.
As you attach each piece, be sure to check for any gaps or inconsistencies in spacing between adjacent pieces. If necessary, adjust accordingly using a pair of pliers until everything lines up perfectly.
Continue working your way around the entire perimeter until all pieces are securely attached within their channels. Once complete, double-check that everything is level and straight before moving on to securing the panel in place permanently.
Securing the Panel in Place
This is a crucial step that ensures your window will stay put and not fall out of its frame. To do this, use glazing points or clips to hold the panel securely against the frame.
These small metal pieces are inserted into the wood around your window and then bent over onto your glass piece using pliers.
Be sure to space them evenly along all four sides of your stained glass panel for maximum stability. If you’re working with a larger or heavier piece, consider adding additional reinforcement such as brackets or chains for added security.
It’s important not to rush this step as securing each point properly can take some time but is essential for ensuring that everything stays in place once installed.
Adding Reinforcement
One way to do this is by adding reinforcement. This can be done in a few different ways depending on the size and weight of your panel.
For smaller panels, reinforcing strips made of zinc or copper can be added along the edges of the glass using soldering techniques. These strips not only add strength but also provide a decorative element to your piece.
For larger panels, steel bars or rods may need to be inserted into channels within the frame for additional support. It’s important that these reinforcements are properly installed so as not to damage or warp any part of the panel.
Final Touches

First, step back and admire your handiwork! Take a moment to appreciate how the colors of the glass catch the light and create a beautiful display in your home.
Next, consider adding some finishing touches to enhance its beauty even further. You could install curtains or blinds that complement or contrast with the colors of your stained glass window.
Alternatively, you might want to place potted plants nearby that will provide an additional pop of color.
Don’t forget about regular maintenance and cleaning for both inside and outside surfaces of windows as well as frames. This will help ensure that your stained glass remains vibrant for years to come.
Regular Maintenance and Cleaning

Dust and dirt can accumulate on the surface of the glass over time, dulling its shine and vibrancy. To clean your stained glass window, start by using a soft-bristled brush or microfiber cloth to gently remove any loose debris from the surface.
Then mix a solution of warm water and mild soap in a spray bottle or bucket.
Spray or apply this solution onto the surface of the stained glass panel while avoiding getting any water on wooden frames if present as it may cause damage over time. Use another clean microfiber cloth dampened with plain water for rinsing off soapy residue from all surfaces including lead lines.
Avoid using abrasive cleaners that could scratch or damage delicate surfaces like painted details on some types of stained glasses.
Troubleshooting Common Issues
One common problem is that the panel may not fit properly in the frame or space allotted for it. This can be due to inaccurate measurements or an uneven surface.
If this happens, you may need to remove the panel and make adjustments to either the frame or hardware.
Another issue that could occur is if your stained glass window rattles when there’s wind blowing outside. This means that it’s not securely fastened in place, which could lead to damage over time if left unaddressed.
To fix this issue, you’ll need to add additional reinforcement such as weatherstripping around the edges of your window.
Lastly, sometimes air bubbles get trapped between pieces of glass during installation which can cause distortion in color and light transmission through your beautiful piece of art! In order for these bubbles not become visible from afar one should try tapping on each individual piece until they are all flush against each other before securing them into place with putty.
Removing and Relocating Stained Glass
There may be situations where you need to remove or relocate the panel. Perhaps you’re moving house and want to take your beloved piece with you, or maybe the window frame needs repair work that requires removal of the glass.
Whatever the reason may be, removing a stained glass panel can seem like a daunting task. The good news is that with some careful planning and attention to detail, anyone can safely remove their stained glass without causing damage.
To begin with, make sure all hardware holding up the panel has been removed before attempting any further steps. Then carefully lift out each individual piece of colored glass from its lead channel using pliers if necessary – being mindful not only about breaking them but also keeping track of which pieces go where so they can easily be reassembled later on.
FAQ
How do you secure a stained glass window?
To secure a stained glass window, attach hooks to the existing framework and hang the stained glass using wire or chain, allowing easy removal for those planning to move.
Can you hang a stained glass window on a wall?
Yes, you can hang a stained glass window on a wall using hooks, screws, or a metal frame, depending on its size and weight.
What holds stained glass windows?
Stained glass windows are held together by narrow strips of lead called “lead came,” which provide flexibility and adaptability for fitting around the various shapes of the glass pieces.
What are the best materials to use when hanging a stained glass window?
The best materials to use when hanging a stained glass window are zinc or brass came, strong hanging wire, and sturdy hooks.
What precautions should be taken to ensure the stained glass window is safely installed?
To ensure the stained glass window is safely installed, proper precautions should include handling with care, using appropriate tools and protective equipment, securing the window in place, and following guidelines for installation and maintenance.
Are there any specific techniques or tools recommended for hanging a stained glass window on different surfaces?
To hang a stained glass window on different surfaces, utilizing proper hooks, anchors, and hanging hardware designed for the specific surface is recommended.
Read More
 Aluminum Window Latch Replacement: A Simple Guide to Security and Style
 Custom Aluminum Window Screens Buying Guide
 Aluminum Window Removal Tool: Easy Steps for a Hassle-Free Window Replacement
 Screw for Aluminum Window Frame: Your Ultimate Fixing Guide
 Replace Aluminum Window Glass: A Beginner’s Guide to a Clearer View
Recap